| |
By following the instruction on this page you should be able to type a command from the Windows Command Prompt where the words you type will be spoken through your Google Home, Google Mini, and/or Google Max.
It also explains on how to integrate this functionality within Push2Run so that you can, for example, say to your Google Device:
"OK Google ask my computer if it is on", and then hear the response:
"Your computer is on" (if it is).
| |
|
| |
To do this you will need download, install and configure some additional software - node.js, node-red, and curl.
The following details all of that:
| Step 1 |
Download, install, and run node.js for Windows
Here you can download Node.js for Windows: https://nodejs.org/en/
Once you have downloaded the file, double click on it to install it.
|
| |
|
| Step 2 |
Setup node-red
Press the Windows Key and the 'R' key at the same time.
In the pop-up box that appears, enter the following and click OK:
CMD
This will open up the Command Prompt window.
At the C:> prompt, type in:
npm install -g --unsafe-perm node-red
npm install node-red-contrib-google-home-notify
node-redNode-red will then start, and it will continue to run as long as the window has not been closed.
So do not close the window, rather just minimize it.
Notes:
| i. |
to exit node-red, just close the Command Prompt window |
| ii. |
to start node-red again in the future, just open the command prompt window and at the c:> prompt enter "node-red" (without the quotes) |
| iii. |
if you want to hide the command prompt window, you can minimize it; if you want to also hide it from your taskbar, there is a freeware program called WinRap that can help you do that. |
| iv. |
if you want node-red to automatically start up when you log onto Windows:
create a file with the extension .bat which contains only the following "node-red" (without the quotes)
press the Windows Key and the 'R' key at the same time
enter "shell:startup" (without the quotes)
drag a shortcut of the .bat file you created into the Windows startup folder
|
|
| Step 3 |
Create a flow within node-red
Open up your browser, for example Google Chrome, and in the website address bar type in the following:
http://127.0.0.1:1880and press enter.
The node-red browser user interface should appear.
You will now need to create a flow in node-red.
Creating a flow in node-red.
To do this, copy the information below (starting with the "[" and ending with the "]" inclusive) into your Windows' clipboard
|
| |
[{"id":"ede9c691.02b7c8","type":"inject","z":"76ad28e0.8a6458","name":"","topic":"Test","payload":"{\"your computer is on\":\"\"}","payloadType":"json","repeat":"","crontab":"","once":false,"onceDelay":0.1,"x":268,"y":163,"wires":[["6cad7ca3.ea8594"]]},{"id":"6c2fddbe.0a36d4","type":"http in","z":"76ad28e0.8a6458","name":"Google Home Notification
Post","url":"/notify","method":"get","upload":false,"swaggerDoc":"","x":251,"y":275,"wires":[["6cad7ca3.ea8594","6a401b9e.024a24"]]},{"id":"6a401b9e.024a24","type":"http response","z":"76ad28e0.8a6458","name":"","statusCode":"","headers":{},"x":507,"y":349,"wires":[]},{"id":"6cad7ca3.ea8594","type":"json","z":"76ad28e0.8a6458","name":"format to json
object","property":"payload","action":"","pretty":true,"x":553,"y":278,"wires":[["7237d688.662728","63ac04a3.be171c","6c35b546.eb83fc"]]},{"id":"63ac04a3.be171c","type":"googlehome-notify","z":"76ad28e0.8a6458","server":"7e2da23b.35427c","name":"Google Home
office","x":839,"y":278,"wires":[]},{"id":"7237d688.662728","type":"googlehome-notify","z":"76ad28e0.8a6458","server":"1e99389f.d4b537","name":"Google Home bedroom","x":861,"y":192,"wires":[]},{"id":"6c35b546.eb83fc","type":"googlehome-notify","z":"76ad28e0.8a6458","server":"1205c4b5.82505b","name":"Google Mini
basement","x":850,"y":349,"wires":[]},{"id":"7e2da23b.35427c","type":"googlehome-config-node","z":"","ipaddress":"192.168.0.22","language":"en"},{"id":"1e99389f.d4b537","type":"googlehome-config-node","z":"","ipaddress":"192.168.0.27","language":"en"},{"id":"1205c4b5.82505b","type":"googlehome-config-node","z":"","ipaddress":"192.168.0.20","language":"en"}]
|
| |
Next, near the top right side of your browser window, click on the three horizontal bars, Import, and Clipboard
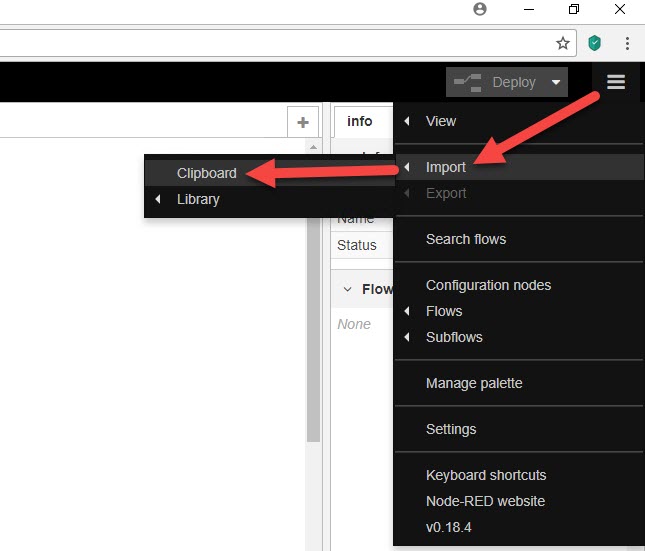
Following this, paste the information you copied into your clipboard into the textbox that appears

and then click 'Import'.
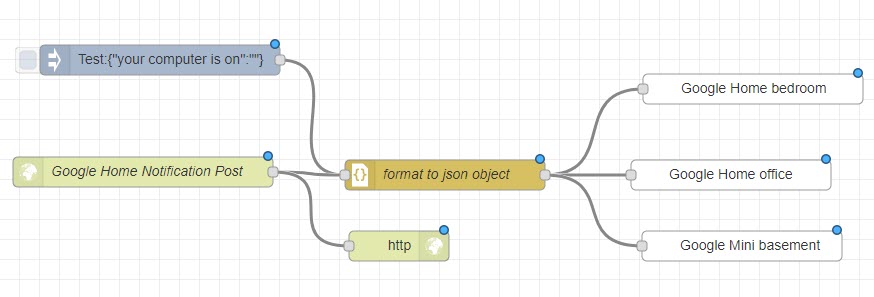
Here is what you should see: |
 |
| |
Of note, the nodes on the right represent the Google device(s) connected within your network. I have three, you can see them listed.
You will need to edit, add and/or remove Google device nodes on the right to match your network setup.
To edit a node, double click on it. Here you will be able to change the name of the device and its IP Address.
| |
If you don't know the IP Address of your Google device, you can find it by opening the Google Home app on your cell phone, tapping on the three horizontal lines at the top left of window, tapping on 'Devices', tapping on your device, tapping on the three dots at the top right of your window, tapping on 'Settings', scrolling to the
very bottom of the window, in the section entitled 'Information', to the right of 'IP Address:' you will see the IP address of your Google device. |
To add a node, click on one of the existing nodes to the right, press Ctrl and C at the same time, and Ctrl and V at the same time. Position the new node where you would like on your window. Once done drag a link line between the 'format to json object' node and the new node.
To delete a device, simply click on it and the press the delete key.
Once you are done, click on the 'Deploy' button at the top right of your screen.
|
| Step 4 |
Download and setup curl for Windows
To do this you will need to know if you are running the 32 or 64 bit version of Windows.
| |
If you don't already know this, press the Windows key and the S key at the same time, type 'About your PC', press Enter, in the window that appears, under Devices Specifications, to the right of System Type it will say if you have the 32 or 64 byte version of Windows. |
Once you know which version of Windows you have, you can get curl for Windows here: https://curl.haxx.se/download.html (near the bottom of the web page).
Once you have downloaded the file, unzip it, and look for the program curl.exe which should be found in the /src directory.
Using Windows File Explorer create a directory called c:\Program Files\curl and copy the curl.exe file into it. You will be prompted for administrative permissions to do this.
|
| Step 5 |
Get your IP address
Before you can test this set up, you will need to know your computer's local internal network IP address.
Press the Windows Key and the 'R' key at the same time.
In the pop-up box that appears, type in:
CMDand press enter.
At the C:> prompt that appears, type in:
ipconfigand press enter.
A bunch of information will appear, under the first grouping, associated with your default network connection, to the right of where it says 'IPv4 Address . . . ' take note of your computer's internal network ip address. For this example mine was 192.168.0.13 so that is what I will use below in the next step.
|
| Step 6 |
Run a quick test
Press the Windows Key and the 'R' key at the same time.
In the pop-up box that appears, type in:
CMDand press enter.
At the C:> prompt that appears, enter these commands - the last one will test your setup thus far
c:
cd \
cd "Program Files\curl"
curl http://192.168.0.13:1880/notify?this%20is%20a%20test you should hear your Google device say "this is a test".
Notes:
i. your IP Address (mine was 192.168.0.13) should be the IP Address you noted in step 5 above
ii. the %20 (which is the ascii code for a space) is important to place between the words you want spoken - in the next step below you will see how this can be made easier, and how you will not have to worry about putting the %20 between the words.
|
| Step 7 |
The following makes it easier to send a notification ...
Below is a .vbs script file which you can download and use to send a message to your Google device now that all the above has been set up.
The script is simple to use, assuming you name it GoogleNotify, to run it (from the C:> prompt or from within Push2Run) you just need to supply the IP Address of the computer running Node-Red and the text you would like broadcast.
For example here is what you would enter to run it from the C:> prompt:
GoogleNotify 192.168.0.13 this is a test
Here is the script:
| |
'Copyright Rob Latour, 2018 - 2020, All Rights Reserved
'v1 released March 25, 2018
' This script helps make an announcement through your Google device, for more information and additional setup requirements please see: www.Push2Run.com\googlenotify.html
' usage is
' GoogleNotify IPAddress What to say
Set args = Wscript.Arguments
Dim IPAddress
IPAddress = args(0)
'Knit the arguments passed in to the script into a single phrase to be spoken
Dim WhatToSay
WhatToSay = ""
For x = 1 to args.length - 1
WhatToSay = WhatToSay + " " + args(x)
Next
WhatToSay = Trim(WhatToSay)
WhatToSay = Replace(WhatToSay," ","%20")
SaySomething IPAddress, WhatToSay
WScript.Quit
Sub SaySomething(IPAddress, WhatToSay)
Const CurlProgramPathAndFileName = """C:\Program Files\curl\curl.exe"""
Dim WhatToRun
WhatToRun = CurlProgramPathAndFileName + " " + IPAddress + ":1880/notify?" + WhatToSay
set oShell = WScript.CreateObject("WScript.Shell")
const WaitUntilFinished = true
const DontShowWindow = 0
oShell.Run WhatToRun, DontShowWindow, WaitUntilFinished
'the code below waits until the curl has ended
strProcess = "curl.exe"
Set objWMIService = GetObject("winmgmts:{impersonationLevel=impersonate}!\\.\root\cimv2")
Set colProcesses = objWMIService.ExecQuery ("Select * from Win32_Process Where Name = '"& strProcess &"'")
Do While colProcesses.Count > 0
Set colProcesses = objWMIService.ExecQuery ("Select * from Win32_Process Where Name = '"& strProcess &"'")
Wscript.Sleep(500) 'Sleep 1/2 second
Loop
End Sub
|
You can download the script from here: GoogleNotify.vbs
|
| Step 8 |
Integrate with Push2Run
Download and save the above script in some folder on your computer (I used the folder C:\MyScripts )
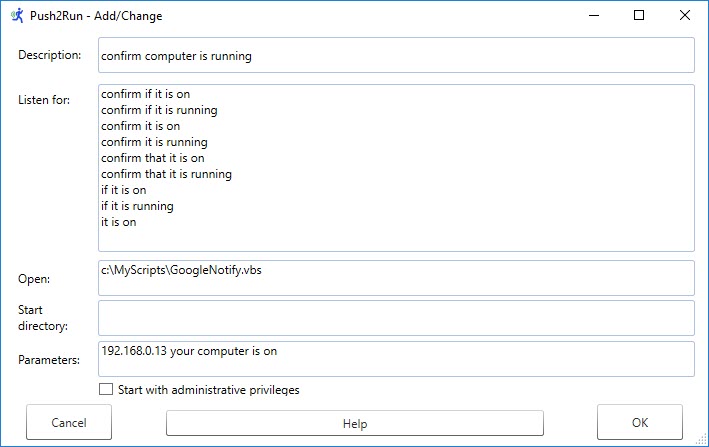
Double click on the following Push2Run card to download it, and then open it to install it within Push2Run
Notes:
i. you will need to change the location of the GoogleNotify.vbs script file if you don't store it in the folder c:\MyScripts
ii. you will need to update the IP address in the Parameters field
iii. the Push2Run Setup Instructions show you how to create an IFTTT applet that is triggered by the expression, "OK Google tell my computer to $". However, in this example you find it better to create another IFTTT applet that is triggered by the expression, "OK Google ask my computer if it is on"
and has a fixed PushBullet body text of "if it is on".
|
| |
|
That's it, hope this write up will be of use to you.
|
|